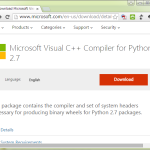
Microsoft Visual C++ Compiler for Python 2.7はひとのためならずで大喜びしたのも束の間。
Contents
Windows で Cython はもう手が届かない夢ではない
そうなんだけれども…
Microsoft Visual C++ Compiler for Python 2.7はひとのためならずの本当の狙いは「Cython」であったりした。で、さぁ、と思ってハメられた。
よくよく考えてみれば当然だが「setuptools」を最新にしたからといって、自動的にPython標準添付の distutils がさしかわるわけではない。
こんな setup.py:
 1 # -*- coding: utf-8 -*-
 2 # -----------------------------------
 3 from distutils.core import setup
 4 from distutils.extension import Extension
 5 from Cython.Distutils import build_ext
 6 from Cython.Build import cythonize
 7 # .........................................
 8 from distutils.sysconfig import get_python_inc
 9 import sys
10 from os import path
11 include_dirs = [
12     get_python_inc(plat_specific=1),
13     "src",
14 ]
15 library_dirs = [
16 ]
17 libraries = [
18 ]
19 # .........................................
20 setup(
21     cmdclass = {'build_ext': build_ext},
22     #...省略...
23 )
24 # .........................................
は、
1 me@host ~$ python setup.py build_ext
で「vcvarsall.batが見つからない」と、相変わらず言われる。
どこかの Python 本体のアップデートで更新される(あるいはCythonがsetuptools依存になる)ことを期待しているが、当座手で直接 distutils を編集してやった。c:/Python27/Lib/distutils に msvc9compiler.py があるはずである。その def find_vcvarsall(version): をこのようにする:
 1 def find_vcvarsall(version):
 2     """Find the vcvarsall.bat file
 3
 4     At first it tries to find the productdir of VS 2008 in the registry. If
 5     that fails it falls back to the VS90COMNTOOLS env var.
 6     """
 7     # 追加BEGIN
 8     VC_BASE = r'Software\%sMicrosoft\DevDiv\VCForPython\%0.1f'
 9     key = VC_BASE % ('', version)
10     try:
11         # Per-user installs register the compiler path here
12         productdir = Reg.get_value(key, "installdir")
13     except KeyError:
14         try:
15             # All-user installs on a 64-bit system register here
16             key = VC_BASE % ('Wow6432Node\\', version)
17             productdir = Reg.get_value(key, "installdir")
18         except KeyError:
19             productdir = None
20     # 追加END
21
22     # 変更BEGIN
23     # 以下部分オリジナルは if not productdir: でない
24     if not productdir:
25         vsbase = VS_BASE % version
26         try:
27             productdir = Reg.get_value(r"%s\Setup\VC" % vsbase,
28                                    "productdir")
29         except KeyError:
30             productdir = None
31     # 変更END
(2015-05-20 追記: オリジナルのファイルのファイルエンコーディング指定がないので、日本語コメントは入れないでね。)
気を取り直して
Windows での Cython は、これまで敷居が高かったと思う。でも「Microsoft Visual C++ Compiler for Python 2.7」があればもう大丈夫、上の措置をしておけば…。
今更 Cython について「紹介」するのは季節はずれもいいところだが、とはいえ Cython について検索してみても、「完全でシンプルな」サンプルはそんなにないように思う。実際は「OSS で実際に使っているもの」が山ほどあるので、それを見れば良いのだが、これだと「複雑すぎる」ことになり、とっつき難いかと思う。なので、ちょっと2時間ほどで簡単な例をでっちあげてみた。
この記事全体で使ったサンプルは
jenkins_spooky_hash_as_just_for_cython_example.zipからダウンロード出来るので、参考にどうぞ。ただし、あくまでも「Cythonのサンプル」として書いただけで、テストも何もしてないので、自己責任でご利用ください。
Cython の Windows 版を入手する
Windows で Cython、の記事のつもりなので。
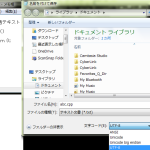
setuptoolsはインストール済み、として、
1 me@host: ~$ easy_install pip
2 me@host: ~$ pip install wheel
http://www.lfd.uci.edu/~gohlke/pythonlibs/#cython より Cython‑0.22‑cp27‑none‑win_amd64.whl (等貴方の環境に合ったもの)を入手、
1 me@host: ~$ pip install Cython‑0.22‑cp27‑none‑win_amd64.whl
Cythonの基礎を説明しだすとキリがないのでコード貼り付け攻撃
Pythonの知識、C の知識、Python の「埋め込み」の知識、Python C API の知識、そして今回の場合は C++ の知識、と、ただでさえ色んな基礎が必要な上に「Cython」という「Python と C のチャンポン言語」、となれば、「お気楽ご気楽Cython」には、もとよりなりえない。やはりある程度の知識がなく飛び込むのは多分無謀だろう。
Cython の使い方には簡単なほうと難しいほうがあって、「元々 pure Python で少々速度に不満があったものを、ちょいと Cython で高速化」は結構「お気楽ご気楽」である。けれど、今回例にするのは、「C++ コードをダイレクトに利用する」方で、難易度が高い方の Cython。
なお、C を呼び出すだけなら ctypes でも良いし、SWIG も選択肢となる。ctypes はむしろ簡単ではない(独特すぎる)けれども pure Python であるし、「C/C++との糊付け」を手軽にやりたければ、SWIG の方が圧倒的に簡単である。
今回例にするのは、Bob Jenkins の「Spooky Hash」にしてみた。多少の難易度があるサンプルでないと、「なんだ簡単じゃん」とわかったつもりになって、実用的に使おうとして一気に落ち込むことになるであろうし。
さて、貼り付け攻撃だ。
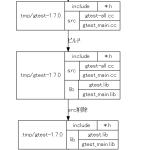
まずはパッケージ構成とフォルダ構成を決めて、setup.py をささっと書いてしまうのがセオリーと思う。構成はこんなふうにしてみた:
1 ./lib/jenkins_hash/spooky.pxd
2 ./lib/jenkins_hash/spooky.pyx
3 ./lib/jenkins_hash/__init__.py
4 ./setup.py
5 ./src/SpookyV2.cpp
6 ./src/SpookyV2.h
7 ./src/TestSpookyV2.cpp
srcの下のものは、Bob Jenkins のサイトから持ってきたままの、そのままで、何一つ書き換えない。
setup.pyは:
 1 # -*- coding: utf-8 -*-
 2 # -----------------------------------
 3 # This is just for explanation of Cython in http://hhsprings.pinoko.jp/site-hhs/,
 4 # thus, DO NOT USE FOR THE PURPOSE OF OFFICIAL USAGE, AND DO NOT TRUST ME.
 5 from distutils.core import setup
 6 from distutils.extension import Extension
 7 from Cython.Distutils import build_ext
 8 from Cython.Build import cythonize
 9 # .........................................
10 from distutils.sysconfig import get_python_inc
11 import sys
12 from os import path
13 include_dirs = [
14     get_python_inc(plat_specific=1),
15     "src",
16 ]
17 library_dirs = [
18 ]
19 libraries = [
20 ]
21 # .........................................
22 setup(
23     cmdclass = {'build_ext': build_ext},
24     packages = ['jenkins_hash'],
25     package_dir = {'jenkins_hash': 'lib/jenkins_hash'},
26     ext_modules = [
27         Extension(
28             "jenkins_hash.spooky",
29             [
30                 "lib/jenkins_hash/spooky.pxd",
31                 "lib/jenkins_hash/spooky.pyx",
32                 "src/SpookyV2.cpp",
33                 ],
34             include_dirs=include_dirs,
35             library_dirs=library_dirs,
36             libraries=libraries,
37             language="c++")]
38 )
39 # .........................................
という具合。
一応「基礎」としては、「pxd」は、C/C++ で言うところの「ヘッダファイル」に近いもの、「pyx」が Python モジュール本体の「実装ファイル」ということになる。「pxd」は必須ではないが、私は pxd と pyx を書くスタイルが好きである。(pxd は他の Cython プロジェクトが「cimport」するのに使えるのでその目的で「配布」出来る。)
spooky.pxd はこんな感じになった:
  1 # -*- coding: utf-8 -*-
  2 # This is just for explanation of Cython in http://hhsprings.pinoko.jp/site-hhs/,
  3 # thus, DO NOT USE FOR THE PURPOSE OF OFFICIAL USAGE, AND DO NOT TRUST ME.
  4 ctypedef unsigned long long uint64
  5 ctypedef unsigned long uint32
  6
  7 cdef extern from "<SpookyV2.h>":
  8
  9     cdef cppclass SpookyHash:
 10
 11         #
 12         # SpookyHash: hash a single message in one call, produce 128-bit output
 13         #
 14         @staticmethod
 15         void Hash128(
 16             const void *message,  # message to hash
 17             size_t length,        # length of message in bytes
 18             uint64 *hash1,        # in/out: in seed 1, out hash value 1
 19             uint64 *hash2) nogil  # in/out: in seed 2, out hash value 2
 20
 21         #
 22         # Hash64: hash a single message in one call, return 64-bit output
 23         #
 24         @staticmethod
 25         uint64 Hash64(
 26             const void *message,  # message to hash
 27             size_t length,        # length of message in bytes
 28             uint64 seed) nogil    # seed
 29
 30         #
 31         # Hash32: hash a single message in one call, produce 32-bit output
 32         #
 33         @staticmethod
 34         uint32 Hash32(
 35             const void *message,  # message to hash
 36             size_t length,        # length of message in bytes
 37             uint32 seed) nogil    # seed
 38
 39         #
 40         # Init: initialize the context of a SpookyHash
 41         #
 42         void Init(
 43             uint64 seed1,       # any 64-bit value will do, including 0
 44             uint64 seed2) nogil # different seeds produce independent hashes
 45
 46         #
 47         # Update: add a piece of a message to a SpookyHash state
 48         #
 49         void Update(
 50             const void *message,  # message fragment
 51             size_t length) nogil  # length of message fragment in bytes
 52
 53         #
 54         # Final: compute the hash for the current SpookyHash state
 55         #
 56         # This does not modify the state; you can keep updating it afterward
 57         #
 58         # The result is the same as if SpookyHash() had been called with
 59         # all the pieces concatenated into one message.
 60         #
 61         void Final(
 62             uint64 *hash1,       # out only: first 64 bits of hash value.
 63             uint64 *hash2) nogil # out only: second 64 bits of hash value.
 64
 65         ##
 66         ## left rotate a 64-bit value by k bytes
 67         ##
 68         #@staticmethod
 69         #uint64 Rot64(uint64 x, int k) nogil
 70
 71         ##
 72         ## This is used if the input is 96 bytes long or longer.
 73         ##
 74         ## The internal state is fully overwritten every 96 bytes.
 75         ## Every input bit appears to cause at least 128 bits of entropy
 76         ## before 96 other bytes are combined, when run forward or backward
 77         ##   For every input bit,
 78         ##   Two inputs differing in just that input bit
 79         ##   Where "differ" means xor or subtraction
 80         ##   And the base value is random
 81         ##   When run forward or backwards one Mix
 82         ## I tried 3 pairs of each; they all differed by at least 212 bits.
 83         ##
 84         #@staticmethod
 85         #void Mix(
 86         #    const uint64 *data,
 87         #    uint64& s0, uint64& s1, uint64& s2, uint64& s3,
 88         #    uint64& s4, uint64& s5, uint64& s6, uint64& s7,
 89         #    uint64& s8, uint64& s9, uint64& s10, uint64& s11) nogil
 90
 91         ##
 92         ## Mix all 12 inputs together so that h0, h1 are a hash of them all.
 93         ##
 94         ## For two inputs differing in just the input bits
 95         ## Where "differ" means xor or subtraction
 96         ## And the base value is random, or a counting value starting at that bit
 97         ## The final result will have each bit of h0, h1 flip
 98         ## For every input bit,
 99         ## with probability 50 +- .3%
100         ## For every pair of input bits,
101         ## with probability 50 +- 3%
102         ##
103         ## This does not rely on the last Mix() call having already mixed some.
104         ## Two iterations was almost good enough for a 64-bit result, but a
105         ## 128-bit result is reported, so End() does three iterations.
106         ##
107         #@staticmethod
108         #void EndPartial(
109         #    uint64& h0, uint64& h1, uint64& h2, uint64& h3,
110         #    uint64& h4, uint64& h5, uint64& h6, uint64& h7,
111         #    uint64& h8, uint64& h9, uint64& h10, uint64& h11) nogil
112
113         #@staticmethod
114         #void End(
115         #    const uint64 *data,
116         #    uint64& h0, uint64& h1, uint64& h2, uint64& h3,
117         #    uint64& h4, uint64& h5, uint64& h6, uint64& h7,
118         #    uint64& h8, uint64& h9, uint64& h10, uint64& h11) nogil
119
120         ##
121         ## The goal is for each bit of the input to expand into 128 bits of
122         ##   apparent entropy before it is fully overwritten.
123         ## n trials both set and cleared at least m bits of h0 h1 h2 h3
124         ##   n: 2   m: 29
125         ##   n: 3   m: 46
126         ##   n: 4   m: 57
127         ##   n: 5   m: 107
128         ##   n: 6   m: 146
129         ##   n: 7   m: 152
130         ## when run forwards or backwards
131         ## for all 1-bit and 2-bit diffs
132         ## with diffs defined by either xor or subtraction
133         ## with a base of all zeros plus a counter, or plus another bit, or random
134         ##
135         #@staticmethod
136         #void ShortMix(uint64& h0, uint64& h1, uint64& h2, uint64& h3) nogil
137
138         ##
139         ## Mix all 4 inputs together so that h0, h1 are a hash of them all.
140         ##
141         ## For two inputs differing in just the input bits
142         ## Where "differ" means xor or subtraction
143         ## And the base value is random, or a counting value starting at that bit
144         ## The final result will have each bit of h0, h1 flip
145         ## For every input bit,
146         ## with probability 50 +- .3% (it is probably better than that)
147         ## For every pair of input bits,
148         ## with probability 50 +- .75% (the worst case is approximately that)
149         ##
150         #@staticmethod
151         #void ShortEnd(uint64& h0, uint64& h1, uint64& h2, uint64& h3) nogil
後半が全部コメントアウトになっているのは「疲れた」から。何も全部必要なわけではないし。
cdef cppclass のみ書いた。これはただ C++ のヘッダファイルを写経しているに等しい。SWIG と違い、自動的には何もしてくれない。pxd の役割は cdef cppclassを書く場所、というわけではなく「ヘッダファイルのようなもの」なので、Cython コードに「公開したいもの」を書く。
nogil キーワードには注意して欲しい。これは「GIL から解放される」ために使う(C API を知っている人ならわかる)もので、性能問題を解決しうる「魔法」だが、これは諸刃の剣。説明はしないが、わからない人は付けないほうがいい。ちゃんと理解出来ている人だけが使うこと。
pyx はこうなった:
 1 # -*- coding: utf-8 -*-
 2 # This is just for explanation of Cython in http://hhsprings.pinoko.jp/site-hhs/,
 3 # thus, DO NOT USE FOR THE PURPOSE OF OFFICIAL USAGE, AND DO NOT TRUST ME.
 4 cimport spooky as impl
 5
 6 #
 7 cpdef tuple hash128(bytes s):
 8     cdef impl.uint64 h1
 9     cdef impl.uint64 h2
10     cdef const void* rawval = <const void*>s
11     impl.SpookyHash.Hash128(rawval, len(s), &h1, &h2)
12     return (h1, h2)
13
14 #
15 cpdef long hash64(bytes s, long seed):
16     cdef const void* rawval = <const void*>s
17     return impl.SpookyHash.Hash64(rawval, len(s), seed)
18
19 #
20 cpdef int hash32(bytes s, int seed):
21     cdef const void* rawval = <const void*>s
22     return impl.SpookyHash.Hash32(rawval, len(s), seed)
23
24 #
25 cdef class Spooky(object):
26     cdef impl.SpookyHash* _impl
27
28     def __cinit__(self):
29         self._impl = new impl.SpookyHash()
30
31     def __dealloc__(self):
32         del self._impl
33
34     def __init__(self, long seed1, long seed2):
35         self._impl.Init(seed1, seed2)
36
37     cpdef update(self, bytes s):
38         self._impl.Update(<const void*>s, len(s))
39
40     cpdef tuple final(self):
41         cdef impl.uint64 h1
42         cdef impl.uint64 h2
43         self._impl.Final(&h1, &h2)
44         return (h1, h2)
今でこそ私はまぁまぁスラスラ書けるけれど、はじめて Cython に取り組むと、かなり混乱すると思う。少なくとも「PyObject*」の知識なく「本気の Cython」はかなりキビシイ。(挙げた例はだからかなり簡単な部類である。)
ビルドするには、(Visual Studio C++ for Python 2.7 の環境で)
1 me@host ~$ python setup.py build_ext --inplace
とすると良い、最初は。pyxと同じ場所に生成物が作られるのでわかりやすい。
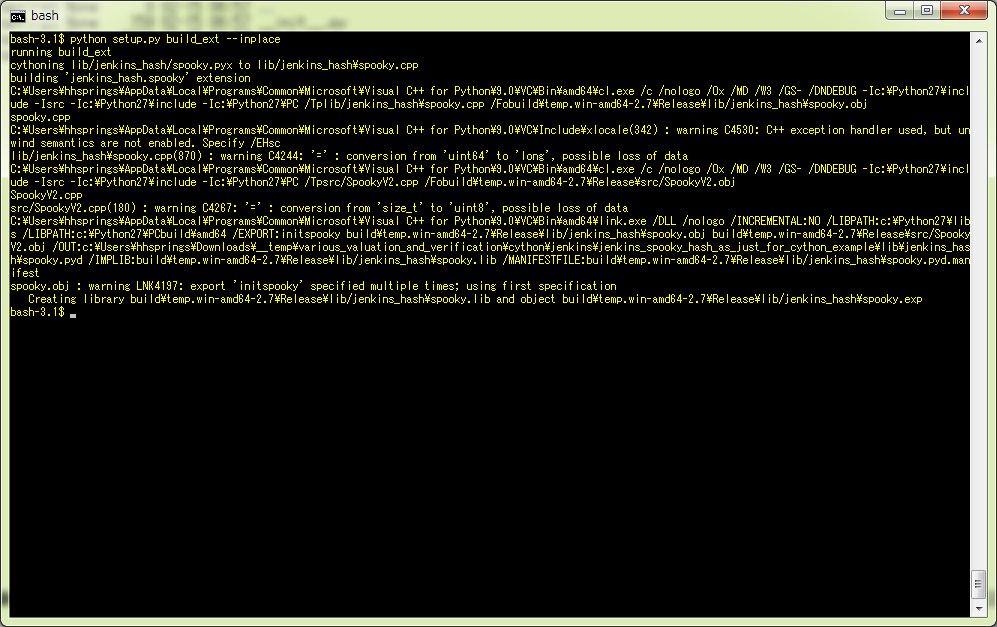
OK。
なお、Windows なので、「.pyd」が作られる。これは「DLL」。UNIX系OSでは「.so」ね。
Cython で作られたものは結局のところ「PythonからはPythonモジュールにしかみえない」。やってみよう。今の場合、lib に cd して python 起動し、
 1 Python 2.7.9 (default, Dec 10 2014, 12:28:03) [MSC v.1500 64 bit (AMD64)] on win32
 2 Type "help", "copyright", "credits" or "license" for more information.
 3 >>> from jenkins_hash import spooky
 4 >>> h = spooky.Spooky(100, 200)
 5 >>> h.update("a" * 1000)
 6 >>> h.update("b" * 2000)
 7 >>> h.update("c" * 3000)
 8 >>> h.final()
 9 (7496187418749914520L, 14141243519903572532L)
10 >>>
OK。(結果が正しいかどうかは知らないよ。テストしてないんだから。)
Windows でも Cython を使おう
「上のコードについて、メモリアロケーションがどのように行われているのかと「Pythonオブジェクトとの行き来」について想像してください」が何言ってるのかわからん、という人は、やめたほうがいいです。雰囲気だけで出来るシロモノではないから。
それでもなお、実際問題、「直接 Python C API だけで書く」よりは遥かに容易に書けるのは確かだし、「直接 Python C API だけで書くよりもオーバヘッドが高い」と言われることはあるけれどもそれは「安全性」とのバランスである。上に上げたコードが「なんだ簡単じゃねーか」と思えるなら、どんどん Cython 使おう。「速くても安全」なプログラムを「比較的簡単に」書けます。


![[MSC v.1500 64 bit (AMD64)]的な出力](http://hhsprings.pinoko.jp/site-hhs/wp-content/plugins/related-posts/static/thumbs/10.jpg)